


جابجایی درختان به روش روتبال سال 1402
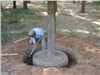
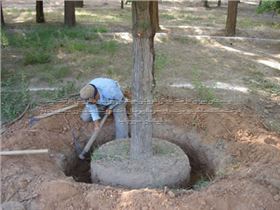
به منظور استفاده از روش روتبال در گام اول می بایست با شناخت از گیاه ،جایگاه گیاه ،میزان رشد، نوع خاک وعوامل مرتبط نسبت به ریشه و انتقال اقدام نمود. مهندس زردادی09159157465
اطلاعات تامین کننده

مشخصات
- مشاور 1
- 09159157465
- مشاوره 2
- 09152157465
توضیحات خدمت
به منظور استفاده از روش روتبال در گام اول می بایست با شناخت از گیاه ،جایگاه گیاه ،میزان رشد، نوع خاک وعوامل مرتبط نسبت به ریشه و انتقال اقدام نموStep-by-Step Process:Bare Root Trees and Shrubs
- Keep roots of bare root trees and shrubs moist and protected at all times prior to planting. Prepare planting hole for each plant before removing it from it's protected, moist site.
- Using a spade or other means of digging, prepare a hole that is large enough to spread the roots without crowding. Rough the sides of the hole to be sure they are not glazed from digging, which would form a barrier for water and roots.
- Inspect the roots of the plant. Prune away any broken or damaged roots.
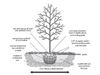
- Place the roots in the hole at a level so that the soil surface will be at the same level where the plant was previously growing, as indicated by the slightly darker area of the trunk. Trees should be planted so that the graft or trunk flare is 1" above the final soil surface. It often helps to form a mound or "cone" of soil on the bottom of the hole and spread the roots over the mound.
- Backfill the soil into the hole a few inches at a time, firming the soil after each addition. While backfilling, be sure the plant remains vertical and be careful not to damage roots. Use water to settle the soil around the roots while backfilling.
- After backfilling is complete, form a ridge of soil around the edge of the hole to puddle and hold water around the plant.
- Place 2 or 3 4-foot stakes around each tree approximately 10" from the trunk. Using a soft rope or tape made especially for tying trees, tie a piece of rope around the trunk to each stake. Be sure the rope being used will not injure the bark. Threading the rope through a short section of old garden hose can protect the tree bark. Stakes can be removed after the first growing season. It is not usually necessary to stake shrubs.
- Thoroughly water the plant. Keep well watered until established. Mulching with wood chips or shredded bark helps retain moisture. Keep mulch 1-2 inches away from the plant's trunk to prevent damage from moisture. Do not overwater. Allow the soil surface to dry to a depth of 1-2" between waterings.
- In areas with cold winters, protect young, smooth-barked trees from sunscald by wrapping the trunks. This practice also protects young trees from rodent and rabbit damage.
Containerized Trees and Shrubs
- Prepare a planting hole as described in #2 above. The depth of the hole should be the same as the soil in the container, and the width of the hole should be at least twice the width of the container.
- Once the planting hole is prepared, lay the containerized tree or shrub on its side and gently slide the plant out of the container. It may be necessary to push on the sides of the container to loosen the root ball. If the plant has become root-bound and roots have circled the container, score the roots in 3-4 places with a knife or pruning shears.
- Place the intact root ball in the hole. Trees should be planted so that the graft or trunk flare is 1" above the final soil surface. This is usually the same level at which the tree was growing in the container.
- Backfill the soil into the hole a few inches at a time, firming the soil after each addition. While backfilling, be sure the tree remains vertical.
- Form a ridge to hold water and stake and protect trees as described above under "Planting Bare Root Trees and Shrubs."
Balled and Burlapped Trees and Shrubs
- Prepare a planting hole as described above. The depth of the hole should be the same as the soil in the root ball, and the width of the hole should be at least twice the width of the root ball.
- Place the root ball into the hole so that the soil surface will be at the same level where the plant was previously growing, as indicated by the slightly darker area of the trunk. This is usually the same level as the soil in the root ball. Trees should be planted so that the graft or trunk flare is 1" above the final soil surface.
- Cut the twine from the root ball and peel back the burlap and any metal basket or other material meant to hold the root ball together. It is not necessary to remove these materials from under the root ball. They can be pushed down along the sides of the root ball into the planting hole and burried. Be sure all parts of the burlap are burried well below the soil surface so that it doesn't wick moisture to the surface. Also be sure to remove all twine from around the trunk of the tree or shrub to allow the plant room for growth.
- Backfill the soil into the hole a few inches at a time, firming the soil after each addition. While backfilling, be sure the tree remains vertical.
- Form a ridge to hold water and stake trees as described above underPlanting Bare Root Trees and Shrubs.
د
سایر محصولات و خدمات شرکت
-
![درخت مراحل آماده سازی-بسته بندی و ارسال نهال به شهرستان1403]() درخت مراحل آماده سازی-بسته بندی و ارسال نهال به شهرستان1403
درخت مراحل آماده سازی-بسته بندی و ارسال نهال به شهرستان1403آموزش مرتبط با کشاورزی
-
![آموزش کاشت پیاز زعفران-پیاز زعفران سال 1403]() آموزش کاشت پیاز زعفران-پیاز زعفران سال 1403
آموزش کاشت پیاز زعفران-پیاز زعفران سال 1403آموزش مرتبط با کشاورزی
-
![روش صحیح تعویض گلدان درسال 1402]() روش صحیح تعویض گلدان درسال 1402
روش صحیح تعویض گلدان درسال 1402آموزش مرتبط با کشاورزی
-
![دستورالعمل تکمیلی مدیریت و کنترل پروانه فری (کرم خراط) درسال 1402]() دستورالعمل تکمیلی مدیریت و کنترل پروانه فری (کرم خراط) درسال 1402
دستورالعمل تکمیلی مدیریت و کنترل پروانه فری (کرم خراط) درسال 1402آموزش مرتبط با کشاورزی
-
![احداث نهالستان میوه در سال 1402]() احداث نهالستان میوه در سال 1402
احداث نهالستان میوه در سال 1402آماده سازی زمین کشاورزی